什麼是ARIMA模型?
今天將介紹量化的其中一項工具- 自迴歸移動平均模型(Autoregressive Integrated Moving Average Model, ARIMA)
$ARIMA(p,d,q)$為時間序列預測模型,能用於預測股價、利率等時間序列資料,是由三個模型組成,如下所示
Autoregressive (自回歸)
利用股票前幾期的報酬率作為自變數,用股票自身的歷史報酬率來預測未來的報酬率
$$ AR(p) \Rightarrow y_t= \alpha + \phi_{1}y_{t-1}+ \phi_{2}y_{t-2} + ... +\phi_{p}y_{t-p}+\epsilon_{t} $$
Integrated (差分整合)
將第(t)期股票報酬率減掉(t-1)期的股票報酬率,讓資料變為定態
$$ y_t=y_{t-1}+\epsilon_{i} $$
Moving Average (移動平均)
利用歷史的殘差作為自變數,用歷史的殘差資料協助預測股票未來的報酬率
$$ MA(q)\Rightarrow y_t=\alpha+\epsilon_t+\theta_{1}\epsilon_{t-1}+\theta_{2}\epsilon_{t-2}+...++\theta_{q}\epsilon_{t-q} $$
模型因為概念容易理解,屬於好上手、廣為人知的模型,使用模型分為以下步驟
1.資料是否為定態,如果非定態,就進行差分處理
2.處理完後,決定落後期數,有兩種方法
- 透過訊息準則選擇落後期數,也就是 $ARIMA_{p,d,q}$ 中的 $p,q$
- 利用ACF和PACF圖輔助
3.進行估計和執行預測
單根問題(unit root)
其中如果原本的資料為非定態,則可以透過d的差分項數來處理,也因此當差分項數為1時,及等同於一階差分過後的ARMA。
當一筆時間序列存在著單根時,會使得變異數發散,這時便無法估計條件期望值。
當存在單根時,假如期數不斷增加到無限大,變異數也將無限發散,然而變異數無限發散的情況下,標準差也將無限擴大,信賴區間隨之增加,這時將無法拒絕H0,使得古典的估計、檢定皆無效。
使用ARIMA預測台積電股價
在財務金融的世界裡,所有投資人都想要知道商品未來價格的走勢,因為掌握了價格的變動,就能把握住獲利的機會,有人是憑著經驗法則,透過以往的經歷來評斷未來會發生的事,也就是透過知識和經驗來進行預測,也有人是利用程式工具,用數據搭配量化的方式來實現這件事。
接著將用Python來動手實作ARIMA模型,並進行預測,使用的資料是台積電(2330)於2021/7/27到2022/7/27的股價資料,頻率為日頻率。
資料來源用yahoo finance
讀取資料
import pandas as pd

df = pd.read_csv(
    '2330.TW.csv',
    parse_dates=['Date'],
    index_col='Date'
)
close_price = df[['Close']].copy()
close_price.tail()
ADF檢定-觀察是否定態
先來看看台積電股價的自相關圖
from statsmodels.graphics.tsaplots import plot_acf
import matplotlib.pyplot as plt

fig = plt.figure(figsize=(10,10))
ax1 = fig.add_subplot(311)
fig = plot_acf(close_price, ax=ax1, title='Autocorrelation')
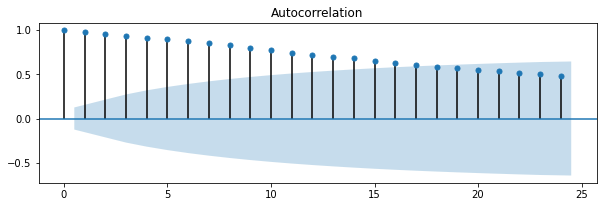
可以看到自我相關係數相當的明顯,通常這樣的現象會存在序列相關,而序列相關的影響就如同前面所說的會使得變異數隨時間發散,造成古典估計失效。
我們也用ADF檢定來看看是否存在單根,虛無假說如下
$$ H_{0}:\phi_{1}=1 $$
from statsmodels.tsa.stattools import adfuller

result = adfuller(close_price)import pandas as pd
print('p-value: {}'.format(round(result[1],4)))

#  p-value: 0.7895
出來結果的P值為0.7895,大於顯著水準,不拒絕虛無假設,也因此我們知道資料為非定態,等等在幫ARIMA定階時要做差分(differencing)處理。
來觀察差分後的自我相關圖
close_price_diff = close_price.diff().dropna()

fig = plt.figure(figsize=(10,10))
ax2 = fig.add_subplot(312)
fig = plot_acf(close_price_diff, ax=ax2, title='Differencing')
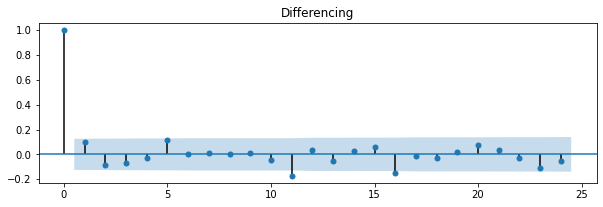
差分過後的自相關看起來變得不顯著了,再用ADF檢定來看看差分過後的結果
result = adfuller(close_price_diff)
print('p-value: %f' % result[1])

# p-value: 0.000000
通過ADF檢定,解決了單根問題
決定落後期數
在替ARIMA模型定階時有兩個常用的方法,一個直接觀察ACF和PACF圖,另一個則是用訊息準則(Information Criterion),有三種常見的訊息準則
- 赤池資訊準則 (akaike information criterion,AIC )
- 赤池資訊準則 (akaike information criterion,AICc)
- 貝式資訊準則 (bayesian information criterion,BIC)
通常在小樣本的時候,會使用AICc,大樣本時使用AIC或BIC,BIC更為強烈,訊息準則越小越好
這邊我們將利用AIC訊息準則來決定階數
from statsmodels.tsa.arima.model import ARIMA
import warnings
warnings.filterwarnings("ignore")

result = {}
for p in range(1, 5):
    for q in range(1, 3):

        model = ARIMA(close_price, order=(p, 1, q))
        results = model.fit()
        result[(p, 1, q)] = results.aic

"""
{(1, 1, 1): 1751.909713144756,
 (1, 1, 2): 1753.1329180870923,
 (2, 1, 1): 1752.7594697101404,
 (2, 1, 2): 1753.4031255615982,
 (3, 1, 1): 1754.5451767758948,
 (3, 1, 2): 1755.4006590416088,
 (4, 1, 1): 1754.7657804720363,
 (4, 1, 2): 1745.6467479071243}
"""
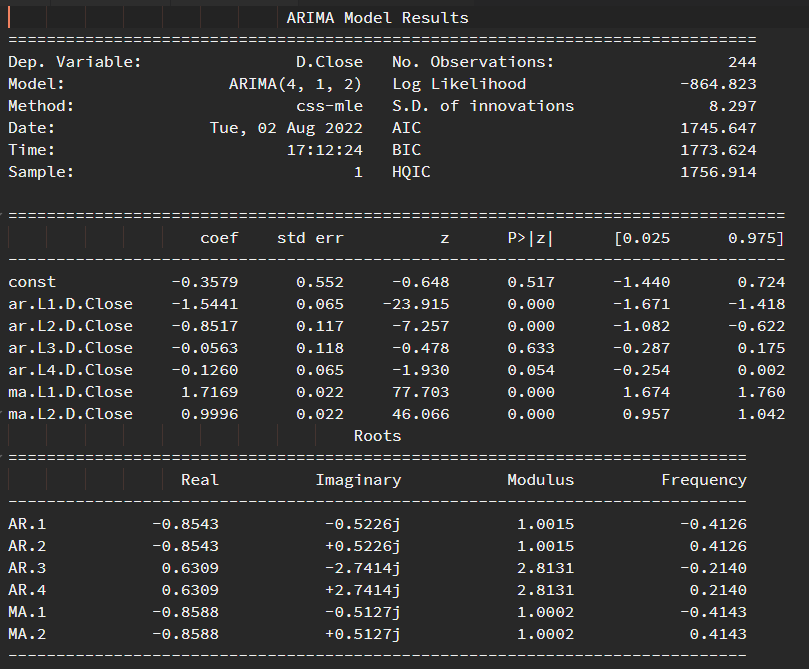
可以觀察到在 p=4 及 q=2 時的AIC為最小,故選擇(4, 1, 2)作為AR和MA的階數
接著我們來看看配適模型後的統計結果
model = ARIMA(close_price, order=(4, 1, 2))
results = model.fit(disp=0)
print(results.summary())
PACF, ACF
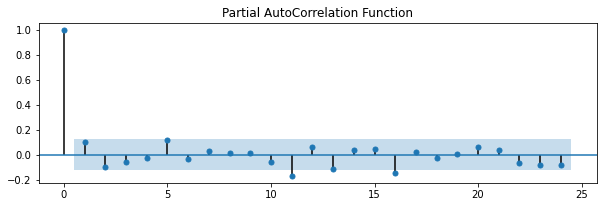
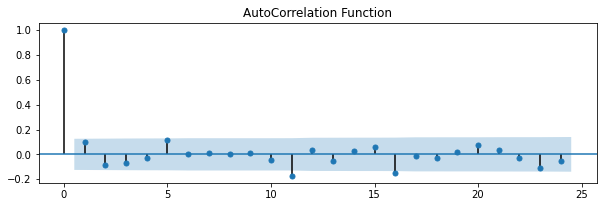
接著我們看看PACF,ACF圖,他們分別稱作偏自我相關和自我相關,剛剛提到定階的另一種方法就是觀察這兩張圖
from statsmodels.graphics.tsaplots import plot_acf
from statsmodels.graphics.tsaplots import plot_pacf

fig = plt.figure(figsize=(10, 10))
ax3 = fig.add_subplot(312)
fig = plot_pacf(close_price.diff().dropna(), ax=ax3, title='Partial AutoCorrelation Function')

fig = plt.figure(figsize=(10, 10))
ax4 = fig.add_subplot(312)
fig = plot_acf(close_price.diff().dropna(), ax=ax4, title='AutoCorrelation Function')
估計和執行預測
接著開始進行預測,我們把資料分為兩個部份,訓練和測試用,用0.8和0.2的比例分配,而當我們預測完一天後,將會把當天的真實結果加進訓練資料,再進行隔天的預測。
也就是每天都預測隔一天的結果,而當天結果出來後,我們取來作為訓練資料,接著再預測隔天
from sklearn.metrics import mean_squared_error

# cut into train and test
price = list(close_price.Close)
cut = int(len(price) * 0.8)
train, test = price[0:cut], price[cut:]

preds = []
lower_bound = []
upper_bound = []
for i in range(len(test)):

    model = ARIMA(train, order=(4, 1, 2))
    model_fit = model.fit(disp=0)

    result = model_fit.get_forecast().summary_frame(alpha=0.05)
    pred = result['mean'].values[0]
    upper, lower = result['mean_ci_upper'].values[0], result['mean_ci_lower'].values[0]

    preds.append(pred)
    lower_bound.append(lower)
    upper_bound.append(upper)

    train.append(test[i])

mse = mean_squared_error(test, preds)
print(f'Mean Squared Error : {round(mse, 4)}')
# Mean Squared Error : 109.7636
預測完後,再計算一下實際和預測資料的誤差,我們用均方誤(MSE)來做比較,MSE越小表示預測表現越好,反之亦然
視覺化
最後,再來將資料視覺化
test_periods = close_price.index[cut:len(price)]

df = pd.DataFrame(index=test_periods)
df.index = pd.to_datetime(df.index)
df['real'] = test
df['pred'] = preds
df['lb'] = lower_bound
df['ub'] = upper_bound

fig = plt.figure(figsize = (12,5))
ax = fig.add_subplot()


fig.suptitle(
    'TSMC Stock Price Prediction & Reality',
    fontsize=22,
    fontweight='bold'
)

start = test_periods[0].date()
end = test_periods[-1].date()
ax.set_title(f'{start} - {end}', fontsize=16,)
fig.subplots_adjust(top=0.85)

ax.tick_params(labelsize=12)
ax.plot(df.real, color='red', label='Real', marker='o',
         markerfacecolor='red',markersize=6)
ax.plot(df.pred, color='#121466', label='Pred', marker='o',
         markerfacecolor='#121466',markersize=6)
ax.legend()

ax.plot(df.lb, color='#121466', ls="--", alpha = 1)
ax.plot(df.ub, color='#121466', ls="--", alpha = 1)

ax.fill_between(df.index,
                df.lb,
                df.ub,
                color = '#121466',
                alpha=.2,)

ax.spines['right'].set_visible(False)
ax.spines['top'].set_visible(False)
plt.savefig('TSMC_prediction.png',dpi=300)

紅色是實際數據,藍色是預測數據,淺藍色的區塊則是預測的信賴區間,可以看到預測和實際的股價走勢很雷同,那是因為我們每一天都會加入前一天的最新(正確)資料,而前一天的資料對預測的影響最為明顯,所以預測走勢的變化通常會和一天的價格變化雷同。
今天使用了ARIMA模型來進行股價預測,可以利用上面的程式碼和介紹,一起體面模型工具預測的樂趣。但還是不免俗的加些警語,預測僅供投資參考,不能當作唯一依據。

