為何畫圖要富含資訊?
在做報告時除了文字的描述,圖表呈現的重要性其實也不亞於文字內容,尤其老闆們時間寶貴,有時甚至掃過報告時都是先看圖表再看文字,因此如果圖上提供了更多的資訊,畫的漂亮,對報告質感肯定有加分的效果!
本篇文章主要介紹使用 Matplotlib 的技巧,並完成一張富涵資訊的圖,Matplotlib 是一個 Python 的視覺化套件,有豐富的作圖能力。
首先先來看一張不加修飾的圖

再看看加工過後的圖
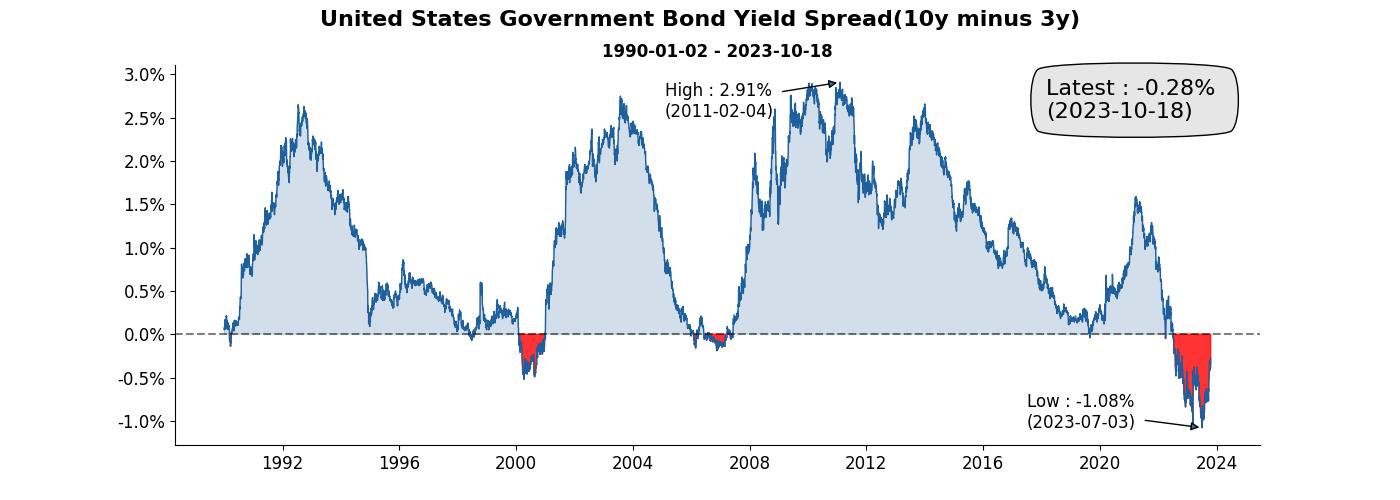
陽春版的圖和加工過後的圖都是使用了同樣的數據,但不同的地方在於,加工過後的圖帶有更多的資訊在裡頭。
同樣一張圖在報告中所佔的空間如果差不多,此時帶有的資訊含量就很重要,類似坪效的概念。
加工過後的圖有標題、加上基準線、用顏色區分正負…等,這些其實都能透過 Matplotlib 完成,來試試吧!
美國公債殖利率爬蟲
接著我們來從美國財政部抓取公債殖利率的數據,在政府提供的數據中已經將各期限的公債殖利率都整理好了,真讚。
這篇主要分享一些視覺化的技巧,就不多介紹爬蟲的部份,有興趣可以參考證交所股票價格爬蟲實作教學-附程式碼(Use Python to collect stock price)呦。
另外下面的爬蟲有用到 Multithreading 來加速,本來全抓完要快 5 分鐘,下面的加速版本縮減到 30 秒,Multithreading 加速可以參考Python - ThreadPoolExecutor 的使用。
資料源以及使用方法可以參考美國財政部所提供的官方文件,如果要從官方直接瀏覽殖利率數據,這是資料源。
我先在爬蟲程式的路徑建立一個 data 的資料夾,用來存放逐年的資料,來直接寫程式抓資料囉!
from datetime import datetime
import xml.etree.ElementTree as ET
import requests
import pandas as pd
import time
import concurrent.futures

# define function for crawling bond yield
def get_bond_yield_data(year: int):

    url = f'https://home.treasury.gov/resource-center/data-chart-center/interest-rates/pages/xml?data=daily_treasury_yield_curve&field_tdr_date_value={year}'
    res = requests.get(url)
    source = res.text

    namespaces = {
            'm': 'http://schemas.microsoft.com/ado/2007/08/dataservices/metadata',
            'd': 'http://schemas.microsoft.com/ado/2007/08/dataservices',
            '': 'http://www.w3.org/2005/Atom'
        }

    maturity_column_mapping = {
        '3m': './/d:BC_3MONTH',
        '6m': './/d:BC_6MONTH',
        '1y': './/d:BC_1YEAR',
        '2y': './/d:BC_2YEAR',
        '3y': './/d:BC_3YEAR',
        '5y': './/d:BC_5YEAR',
        '7y': './/d:BC_7YEAR',
        '10y': './/d:BC_10YEAR',
        '20y': './/d:BC_20YEAR',
        '30y': './/d:BC_30YEAR',
    }

    tree = ET.ElementTree(ET.fromstring(source))
    root = tree.getroot()
    entries = root.findall('.//entry', namespaces)

    # loop over each element to get the data
    output = {}
    for entry in entries:
        date = entry.find('.//d:NEW_DATE', namespaces).text
        date = datetime.strptime(date.split('T')[0], '%Y-%m-%d')
        output.setdefault(date, {})
        date_yield_data = output[date]

        # loop over get every maturity bond yield
        for maturity, col in maturity_column_mapping.items():
            value = entry.find(col, namespaces)
            yield_rate = round(float(value.text) / 100, 4) if value is not None else None
            date_yield_data.setdefault(maturity, yield_rate)

    print(f'{year} done')

    df = pd.DataFrame(output).T
    df.index.name = 'Date'
    df.to_csv(f'data/bond_yield_rate_{year}.csv')


start = 1990
end = 2023
year = range(start, end+1)

start = time.time()

with concurrent.futures.ThreadPoolExecutor() as executor:
    results = executor.map(get_bond_yield_data, year)

end = time.time()

print(f'Total: {end - start} second(s).')
抓完把逐年的資料合併成一個 DataFrame(),方便等等操作。
import pandas as pd
import os

data_dir = 'data'
files = [
    os.path.join(data_dir, f)
    for f in os.listdir(data_dir)
]
df = pd.concat(
    map(pd.read_csv, files),
)
df.set_index('Date', inplace=True)
df.index = pd.to_datetime(df.index)
df.sort_index(inplace=True)
我們關心的是 10 年期和 2 年期公債的殖利率利差,因此需要先將利差計算出來
spread = df['10y'] - df['2y']
spread.dropna(inplace=True)
資料都整理好,可以來做圖了!
(如果懶得爬跟整理,這邊有本篇範例利用的資料 XD)
Matplotlib使用技巧
首先來畫個陽春版的
import matplotlib.pyplot as plt

plt.plot(spread)

真的很陽春,接著來畫加工版的!
打底
先來做個底圖
fig = plt.figure(figsize = (14,5))
ax = fig.add_subplot()
fig.suptitle('United States Government Bond Yield Spread(10y minus 3y)',
             fontsize=16,
             fontweight='bold')
fig.subplots_adjust(top=0.87)

start = spread.index[0].date()
end = spread.index[-1].date()
ax.set_title(f'{start} - {end}',
             fontsize=12,
             fontweight='bold')

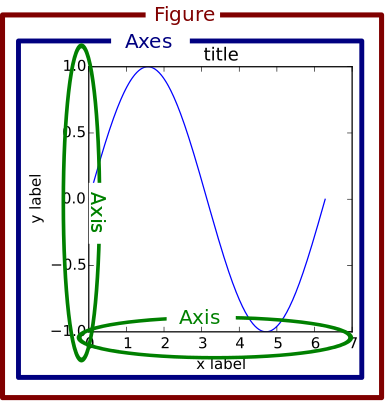
在許多的視覺化教學中都會直接用 plt,或者是 fig, ax = ... 開始,來理解一下他們到底是什麼。
透過下面這張圖就很清楚,最外圈就是 fig ,也就是完整的一張圖,而 ax 就是圖中的子圖(subplot),因此我們的程式碼中也有寫到 ax = fig.addsubplot() ,其實就是要把 ax 的內容畫到 fig 上頭。
我們也設置了 fig 的標題和 ax 的標題,做出子標題的效果,另外也寫了 start 跟 end 作為資料期間的變數,避免未來需要 hard coding。
折線圖
再來把利差給畫出來
...

ax.plot(spread, linewidth=1, alpha=1, color='#1e609e')
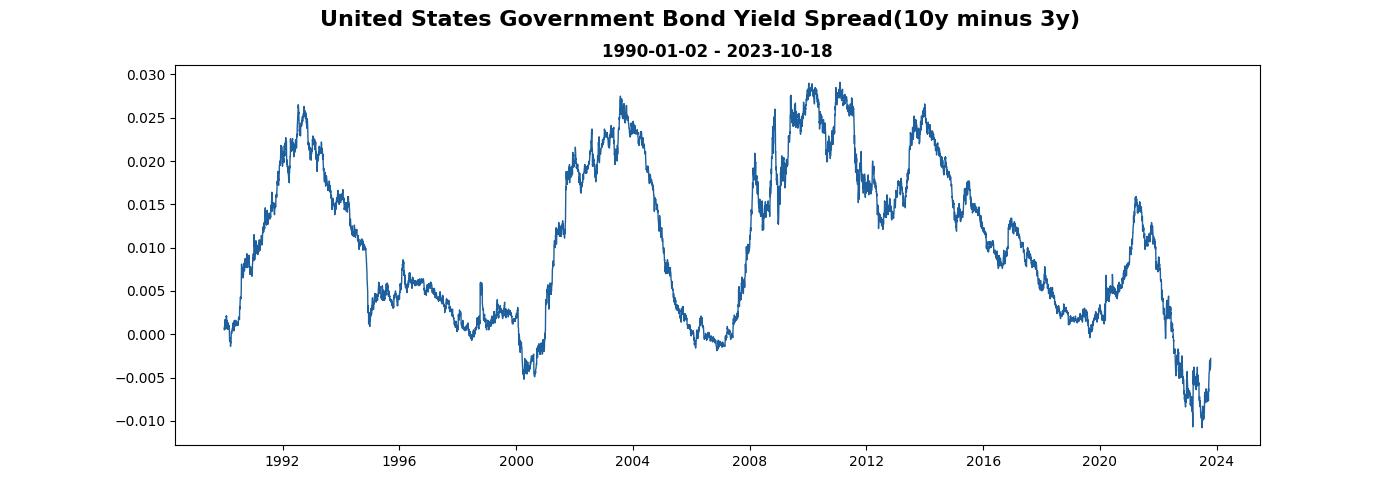
顏色大家可以用 color picker 挑,我選了 #1e609e 。
基準線
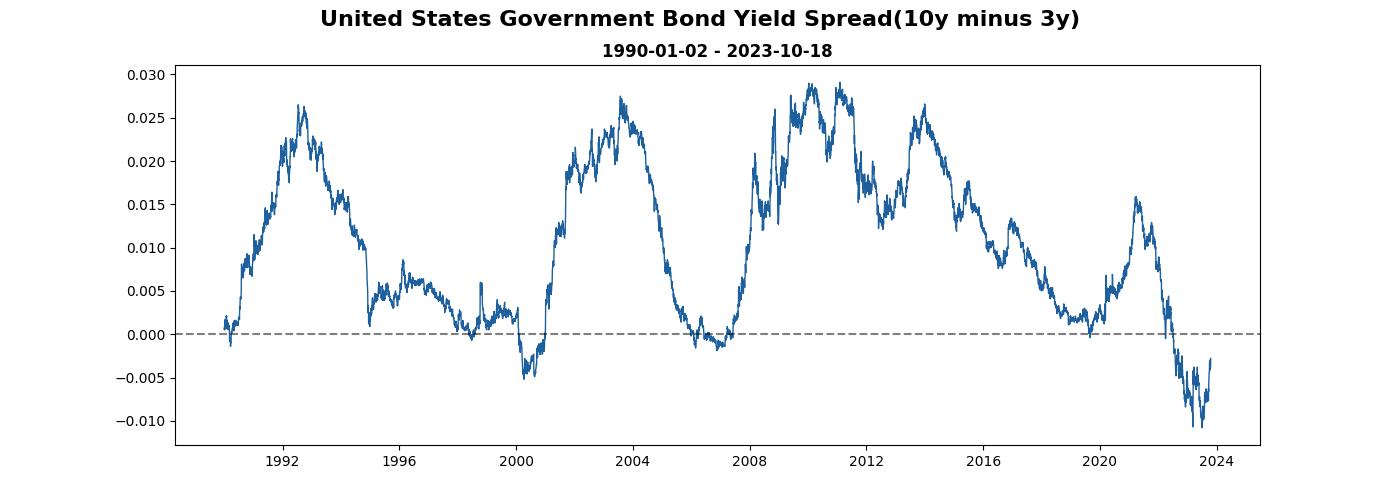
而利差有曾經為負的時候,對於財務金融有認識的人應該多少聽過殖利率倒掛現象,一般來說,長天期公債殖利率應當高於短天期公債殖利率。
以我們的例子來說,10 年公債殖利率減掉 2 年期的結果應該要為正,看到圖表可以發現也是有呈現負的時候,因此可以來加條為 0 的基準線輔助觀察。
...

ax.axhline(y=0, color="k", ls="--", alpha = 0.5)
填滿基準線和資料間的空白(fill between)
加入基準線後,確實能輔助觀察資料,但總感覺還是有點太白了些,我們來把基準線和資料間的空白加入顏色,選相近色。
而倒掛(利差轉負)是很重要的市場訊號,用紅色填滿。
...

ax.fill_between(spread.index, 0, spread,
     where=spread < 0, color="red",
     alpha=0.8),
ax.fill_between(spread.index, 0, spread,
     where=spread >= 0, color="#1e609e",
     alpha=0.2)
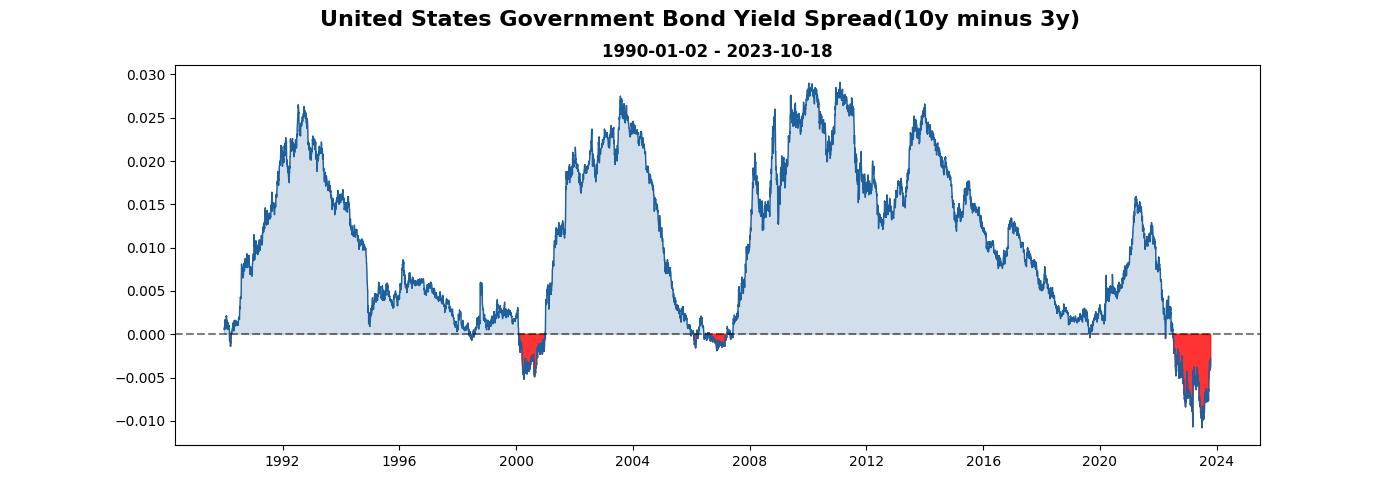
越來越有樣子囉!
調整 x, y 軸字體大小
看圖表時總覺得有些吃力,來把座標軸字調大一點
...

ax.tick_params(axis="x", labelsize=12)
ax.tick_params(axis="y", labelsize=12)
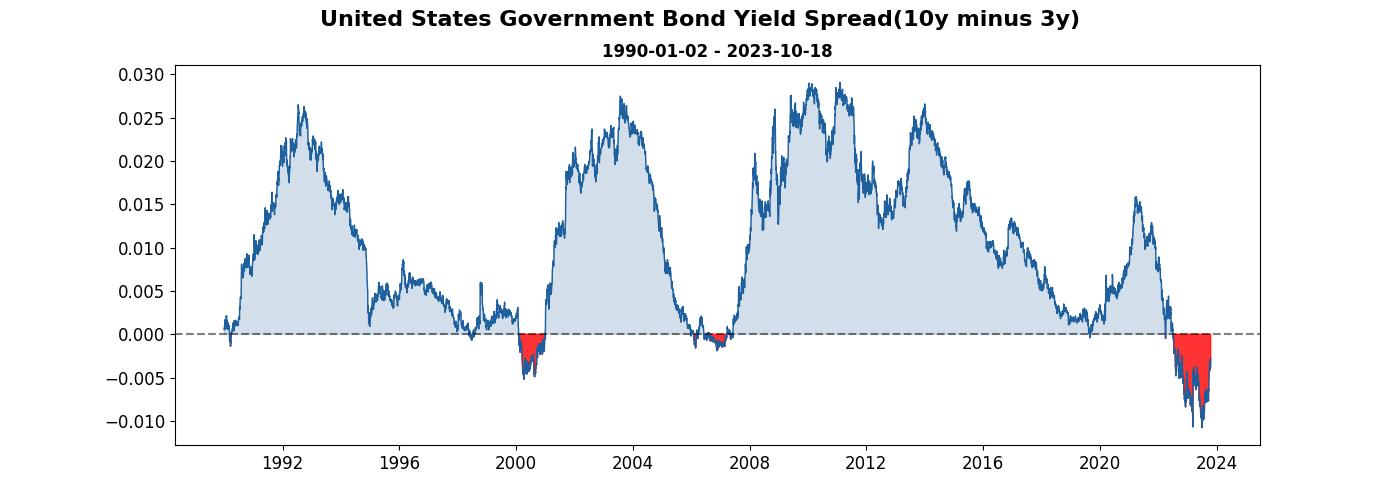
看起來稍微好一點囉。
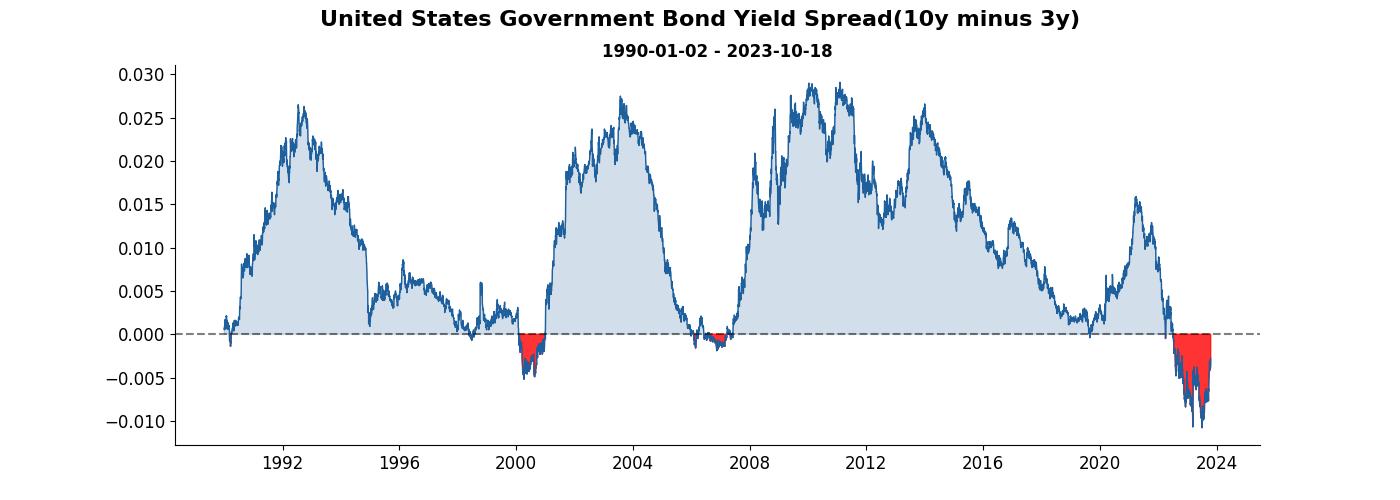
隱藏邊框
看到很多專業的圖表都不會有邊框,那我們的圖能不能也把它隱藏起來呢? 答案是可以。
...

ax.spines['right'].set_visible(False)
ax.spines['top'].set_visible(False)
加上歷史最高最低和最新資訊
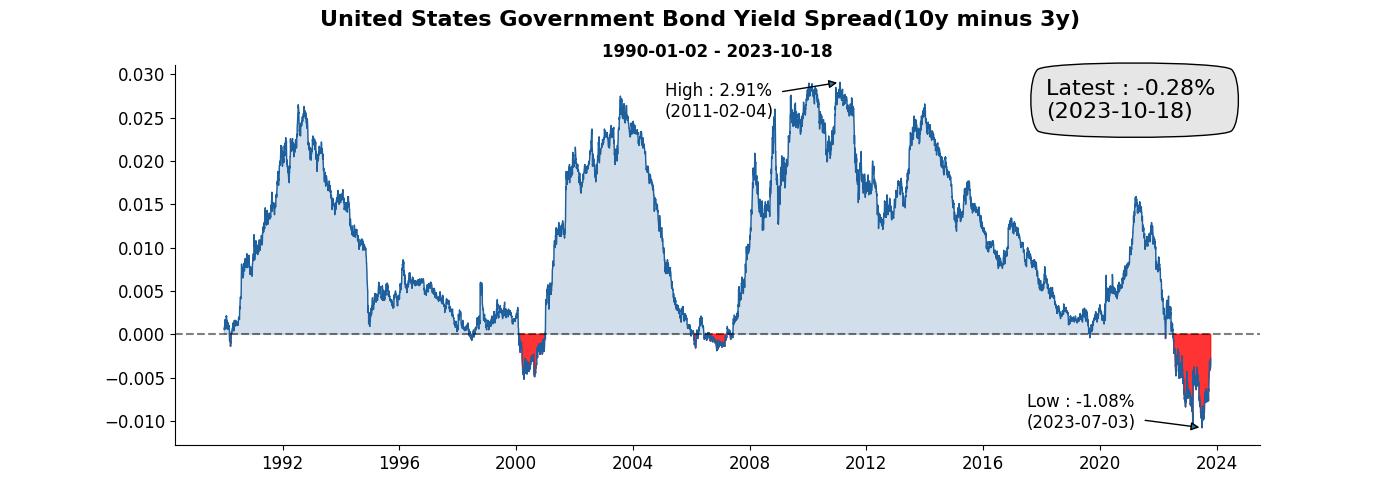
看到圖後,通常也會想知道最新的資訊數值是多少,除了最新資訊外,歷史最大和最小也能夠一併加入,這樣看到圖就能夠馬上一目了然。
這邊值得一提的地方為 ax.annotate 變數中的參數 arrowprops 可以用來更換箭號的風格, bbox 則可以更換裝著最新資訊的外框風格。
...

from dateutil.relativedelta import relativedelta

min_spread = round(spread.min(), 4)
max_spread = round(spread.max(), 4)
latest = round(spread[-1], 4)

min_spread_idx = list(spread).index(spread.min())
max_spread_idx = list(spread).index(spread.max())

date_of_min_spread = spread.index[min_spread_idx].date()
date_of_max_spread = spread.index[max_spread_idx].date()

ax.annotate(f'Low : {min_spread*100:.2f}% \n({date_of_min_spread})',
     xy=(date_of_min_spread, min_spread),
     xycoords='data',
     xytext=(date_of_min_spread - relativedelta(years=6), min_spread),
     textcoords='data',
     arrowprops=dict(arrowstyle='-|>'),
     fontsize=12)

ax.annotate(f'High : {max_spread*100:.2f}% \n({date_of_max_spread})',
     xy=(date_of_max_spread, max_spread),
     xycoords='data',
     xytext=(date_of_max_spread - relativedelta(years=6), max_spread - 0.004),
     textcoords='data',
     arrowprops=dict(arrowstyle='-|>'),
     fontsize=12)

ax.annotate(f'Latest : {latest*100:.2f}% \n({end})',
     xy=(spread.index[-int(len(spread)/6)].date(), 0.025),
     xycoords='data',
     bbox=dict(boxstyle="round4, pad=.8", fc="0.9"),
     fontsize=16)
調整 y 軸的單位為百分比
把 y 軸的單位調成百分比。
...

from matplotlib.ticker import FuncFormatter
def percentage_formatter(x, pos):
    return f'{x*100:.1f}%'

ax.yaxis.set_major_formatter(FuncFormatter(percentage_formatter))

存檔
fig.savefig('yield_spread.png', dpi=300)
執行後就會發現資料夾多了一張圖,完成!
是不是比陽春版的有質感多了呢,除了賞心悅目外,也為報告提供了更多的資訊。
完整程式碼
以上就是今天視覺化技巧的分享,完整的程式碼附在下面
爬蟲
from datetime import datetime
import xml.etree.ElementTree as ET
import requests
import pandas as pd
import time
import concurrent.futures

# define function for crawling bond yield
def get_bond_yield_data(year: int):

    url = f'https://home.treasury.gov/resource-center/data-chart-center/interest-rates/pages/xml?data=daily_treasury_yield_curve&field_tdr_date_value={year}'
    res = requests.get(url)
    source = res.text

    namespaces = {
            'm': 'http://schemas.microsoft.com/ado/2007/08/dataservices/metadata',
            'd': 'http://schemas.microsoft.com/ado/2007/08/dataservices',
            '': 'http://www.w3.org/2005/Atom'
        }

    maturity_column_mapping = {
        '3m': './/d:BC_3MONTH',
        '6m': './/d:BC_6MONTH',
        '1y': './/d:BC_1YEAR',
        '2y': './/d:BC_2YEAR',
        '3y': './/d:BC_3YEAR',
        '5y': './/d:BC_5YEAR',
        '7y': './/d:BC_7YEAR',
        '10y': './/d:BC_10YEAR',
        '20y': './/d:BC_20YEAR',
        '30y': './/d:BC_30YEAR',
    }

    tree = ET.ElementTree(ET.fromstring(source))
    root = tree.getroot()
    entries = root.findall('.//entry', namespaces)

    # loop over each element to get the data
    output = {}
    for entry in entries:
        date = entry.find('.//d:NEW_DATE', namespaces).text
        date = datetime.strptime(date.split('T')[0], '%Y-%m-%d')
        output.setdefault(date, {})
        date_yield_data = output[date]

        # loop over get every maturity bond yield
        for maturity, col in maturity_column_mapping.items():
            value = entry.find(col, namespaces)
            yield_rate = round(float(value.text) / 100, 4) if value is not None else None
            date_yield_data.setdefault(maturity, yield_rate)

    print(f'{year} done')

    df = pd.DataFrame(output).T
    df.index.name = 'Date'
    df.to_csv(f'data/bond_yield_rate_{year}.csv')


start = 1990
end = 2023
year = range(start, end+1)

start = time.time()

with concurrent.futures.ThreadPoolExecutor() as executor:
    results = executor.map(get_bond_yield_data, year)

end = time.time()

print(f'Total: {end - start} second(s).')
畫圖
import matplotlib.pyplot as plt

fig = plt.figure(figsize = (14,5))
ax = fig.add_subplot()
fig.suptitle('United States Government Bond Yield Spread(10y minus 3y)',
             fontsize=16,
             fontweight='bold')
fig.subplots_adjust(top=0.87)

start = spread.index[0].date()
end = spread.index[-1].date()
ax.set_title(f'{start} - {end}',
             fontsize=12,
             fontweight='bold')

ax.plot(spread, linewidth=1, alpha=1, color='#1e609e')

# 基準線
ax.axhline(y=0, color="k", ls="--", alpha = 0.5)


# 填滿
ax.fill_between(spread.index, 0, spread,
     where=spread < 0, color="red",
     alpha=0.8),
ax.fill_between(spread.index, 0, spread,
     where=spread >= 0, color="#1e609e",
     alpha=0.2)

# 字體大小
ax.tick_params(axis="x", labelsize=12)
ax.tick_params(axis="y", labelsize=12)

# 邊框顯示調整
ax.spines['right'].set_visible(False)
ax.spines['top'].set_visible(False)

# 加註解
from dateutil.relativedelta import relativedelta

min_spread = round(spread.min(), 4)
max_spread = round(spread.max(), 4)
latest = round(spread[-1], 4)

min_spread_idx = list(spread).index(spread.min())
max_spread_idx = list(spread).index(spread.max())

date_of_min_spread = spread.index[min_spread_idx].date()
date_of_max_spread = spread.index[max_spread_idx].date()

ax.annotate(f'Low : {min_spread*100:.2f}% \n({date_of_min_spread})',
     xy=(date_of_min_spread, min_spread),
     xycoords='data',
     xytext=(date_of_min_spread - relativedelta(years=6), min_spread),
     textcoords='data',
     arrowprops=dict(arrowstyle='-|>'),
     fontsize=12)

ax.annotate(f'High : {max_spread*100:.2f}% \n({date_of_max_spread})',
     xy=(date_of_max_spread, max_spread),
     xycoords='data',
     xytext=(date_of_max_spread - relativedelta(years=6), max_spread - 0.004),
     textcoords='data',
     arrowprops=dict(arrowstyle='-|>'),
     fontsize=12)

ax.annotate(f'Latest : {latest*100:.2f}% \n({end})',
     xy=(spread.index[-int(len(spread)/6)].date(), 0.025),
     xycoords='data',
     bbox=dict(boxstyle="round4, pad=.8", fc="0.9"),
     fontsize=16)

# 改 y 軸顯示
from matplotlib.ticker import FuncFormatter
def percentage_formatter(x, pos):
    return f'{x*100:.1f}%'

ax.yaxis.set_major_formatter(FuncFormatter(percentage_formatter))


# 存檔
fig.savefig('yield_spread.png', dpi=300)
參考
Annotate Time Series plot in Matplotlib

